Tuesday, July 30, 2013

My "I'm Not an Italian But I Married One" Lasagna.


No, I was not born Italian.  In fact, my mother's idea of seasoning was salt and pepper and to this day she can't handle much garlic.  Not me. Spices opened up a whole new world for me.  I love them.  In fact, I love to grow, smell and cook with all herbs.  I was given a great generic cookbook when I married my husband and it was not an Italian cookbook.  The recipe had good bones, but I have made some changes over the years and made it into my own recipe.  In fact, my Italian husband said it was my best lasagna ever the other night. Not too bad. 

I use lean beef, 2 pounds of it.  Sometimes I mix 1 pound of extra lean with one pound of ground round, but I like to keep it lean. 


I also like to use 2-28 ounce cans of crushed tomatoes.  Use the tomatoes that don't add citric acid, you can add your own salt.


Of course, always use fresh parsley and basil.  I use Italian parsley because it has more flavor.


I do cheat with the lasagna noodles.  I no longer cook the noodles and then lay them on wax paper before layering my lasagna.  I now use the no-boil noodles and they work great.  Just make sure you add some juice from your sauce on the bottom of the pan before adding the noodles. I layer it this way:
a little sauce
noodles
1/2 of the ricotta mix
1/2 of the sauce
mozzarella cheese
noodles
the other 1/2 of the ricotta mix
the rest of the sauce
mozzarella cheese
Yum.


My husband insists on whole-fat mozzarella cheese. I have to agree, it's not like you make this too often.  I cut back in other ways, like part skim ricotta and the lean ground beef. 


I like to cook it in a pretty dish.  It's a more complex recipe and needs the surrounding frame of a great dish.


Here's the recipe.


Lasagna

2 lbs ground beef
1 onion chopped

I spray the pot with cooking spray and cook the meat and onions together over medium heat until the juices cook out.  Add:

2 28 ounce cans crushed tomatoes
1 tsp garlic powder
2 tablespoons chopped fresh parsley
2 tablespoons chopped fresh basil
salt and pepper to taste
1/2 tsp crushed red pepper flakes
1 bay leaf

Cook over medium heat for about an hour.
Meanwhile, mix together:

1 32 ounce ricotta cheese (I use part-skim)
1/2 cup Parmesan cheese
4 eggs
1 tablespoon chopped fresh parsley

You will also need:
1 pkg no-cook lasagna noodles
2 lb pkg shredded mozzarella cheese (not part-skim)

After your sauce has cooked for the allotted time, spoon a little into your prepared pan* (remember to remove the bay leaf). Add 5-6 of the no-bake lasagna noodles covering the bottom of the pan. Layer next, 1/2 of the ricotta cheese mixture, then 1/2 of the sauce and top with 1/2 of the mozzarella cheese.  Repeat the layering.  Cook at 350 degrees for 30-45 minutes or until bubbly.

*You can use one large lasagna pan or make 2 pans with one pan 9"x 13" and the other 8"x 8".  


Sunday, July 28, 2013

Lake House Weekend!


We are very lucky to have friends who invite us up to their beautiful lake house each year. I thought I would just share some of the pictures of the beautiful ways she has set up their refuge by the lake.  Enjoy!


If you think this looks great from the outside, check out all the great details she used in the house. It's really beautifully decorated.


I love all of her "lake decor." Check out the door to the master bedroom.


This is on the screened porch looking onto the lake.


This is the main area, so welcoming!


A great view into the dining and kitchen area.


I really love all the details, this is the window covering for the powder room.


Check out this great way to provide lighting with lanterns hanging from a ladder. 


My host leading the way to the top deck of the boathouse.  Another great view!


So beautiful!  Can't wait to visit again.


Thursday, July 25, 2013

Adding Some Spark to your Storage!


If you look above at my blog title, you'll see a quote from Alexandra Stoddard.  I read another one of her books, "Living A Beautiful Life" about 20 years ago and changed the way I thought about the smaller details of life.  She encouraged me to look at the everyday aspects of living and make them more pleasing.  Change the way your store your Parmesan cheese or eggs in the refrigerator, paint or wallpaper your closet, put your laundry detergent in a glass container.

  These may sound silly, but you will look into your closet or refrigerator at least 20 times a day (at least I do).  Why not make those areas of your home appealing to the eye as you would your kitchen or bedroom? How often are you in the laundry room?  Think about it. Why don't we make the everyday tasks more pleasant for us and our family? 

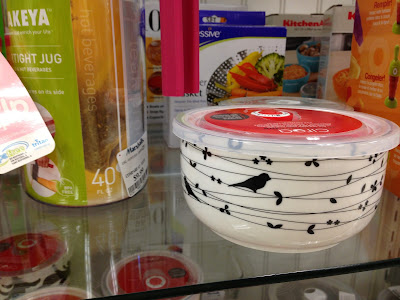
Recently I was inspired to revisit some of her ideas when I saw some of these great storage bowls at Marshalls.  You can also buy them at T.J. Maxx or HomeGoods. They start around $4 and are really great for storing cheese, lemons for your tea, berries or your container of margarine. I like seeing them instead of the plastic containers in my refrigerator.  I like this idea, and a lot of others she suggest.  If you want more great ideas, you can read the book here. You don't have to do all 500 of her suggestions, but you'll be surprised how adding just a few of them can add some joy to your day. 


Tuesday, July 23, 2013

Creating A Succulent Container.


I'm going to visit some friends next week at their lake house and was wondering what to give them as a hospitality gift.  I had given plants before, but most plants need to much care to be left at a second home that may not be occupied for weeks at a time.  I had created a few succulent containers for my porch this screen and love the way they look and the low maintenance.  What a great idea for my gift! Its so easy to put it together and I have a few suggestions for making it more wallet friendly.

First, you can get so many different succulents at you local Home Depot or Lowes.  I decided to use Lowes since that is where I saw them first.  You can get them sold as single plants or as multiple packets.  I bout a few that were sold in sets of 4 and one single succulent, that was a little larger.  The packets of 4 were around five dollars and the single plant was around three dollars.  I bought two sets of four and one single plant. 
 I had purchased this lower edged blue bowl at Hobby Lobby recently.  Most of their summer items are really marked down now.  Some of the other containers that are shown up above I had bought from either Homegoods, T.J. Maxx, or Marshalls and I have seen some really pretty containers at Home Depot.  I usually don't spend over ten dollars unless it really speaks to me. Please check to see if your succulents are for high light or low low and you can check out this article at Davesgarden.com for information on planting and care.


I bought soil used for cactus, as succulents are in the cactus family.  My bowl did not have a drainage hole which does not bother me since I am going to add a layer of rock for drainage and you won't want to water these too much.  You can get great decorative rocks or stones so cheaply at you dollar store in the floral area.  


First put down your layer of stones.  Then add a layer of soil about 1" deep.  Set the plants in where you want them.  Feel free to move them around until you get a good feel of how they look.  Don't forget how the plants will grow, so keep the larger plants in an area that won't take over the smaller ones and be sure to place the succulents that tend to cascade planted near the edge of your container.

Add additional soil a little at a time to fill in around your plants.  Once you have it all together, you will need to add some water. 


I used a sprayer to first add water so that I didn't add too much and so I could spray away the soil that had fallen into the plants.  You don't want to water these plants too much.  I met a guy last weekend who sold some beautiful succulents and he advised me to only water when the succulents lost their shine.  I sometimes miss that but you can check the site mentioned above for more about care. 

Here are some that are more established.  An easy way to add some green to your home.


Thursday, July 18, 2013

White Bean Salad

I love a white bean salad with any meal.  It has such great color and is loaded with all the healthy things you and I need. You can use any white bean of your choice, garbanzo, cannelloni, or I used Great Northern Beans here. We're having it tonight as a side to my Turkey Stuffed Peppers.  Try it for a quick change from your regular salad.

White Bean Salad

1 can of white beans, drained and rinsed
1/2 pint of cherry tomatoes, halved
1 tablespoon chopped parsley
2 tablespoons sliced scallions
2 tablespoons halved green olives
1 tablespoon olive oil
2 teaspoons red wine vinegar
1 teaspoon garlic powder
salt and pepper

Mix the beans, tomatoes, parsley, scallions and olives together.  Season with garlic powder and salt and pepper according to your tastes.  Toss with the olive oil.  Add the vinegar and mix again.  Enjoy!

This makes about 2 cups of salad.  Very easily doubled.


Tuesday, July 16, 2013

Redefining Thrift Furniture with Homemade Chalk Paint


I have been getting my youngest daughter ready for her first apartment.  I don't know about you, but all my spare furniture went with my first daughter when she leased her first apartment, so we don't have as much to offer.  Not to fear, there are a few castoffs from my first child, and there are so many wonderful things to find new at great stores like Homegoods, Ikea and Hobby Lobby (yes, Hobby Lobby has some furniture!), but don't overlook the gems at the thrift stores.  I've noticed lately that there are so many more thrift stores which has made it easier to find great deals that need a little adjustment. I found a great nightstand at the thrift store and my daughter and I decided to paint it with chalk paint.


My daughter loves the Shabby Chic look and last year we did a cute bureau with some chalk paint we purchased at an antique store.  It looked great but the paint was so expensive. Since then I've noticed a lot of pins on Pinterest for homemade chalk paint, so of course I had to try it.  I found a great recipe at The Our Prairie Home blog and it really worked well. Click here to read about it.

I used:
1 Cup of Hot Water
1 Cup of  Plaster of Paris
3 Cups of Tinted Flat Paint

This was enough for a desk and a nightstand.

Please be sure you know to use gloves, a face mask and glasses (I always have on my readers) to make sure you don't the plaster of Paris in your eyes, nose or on your skin.  Please be careful and do this! 

I used basic kitchen utensils and bought the cheapest flat paint * I could find.  I had them tint it in the color I wanted--the color ended up a lighter that the paint color, but that worked out well for us. I first sanded the pieces, one discard and one thrift find.  They say you don't even need to sand it first, but I wanted to be sure it worked.

 I mixed the water and Plaster of Paris with a wisk and then added the paint by stirring.


We applied 3 coats with at least 6 hours of drying time in between. We added Annie Sloan soft wax for a finish to protect the paint. It darkened the paint a little, but that could be because I put too much on the first time.  Be sure to read her directions very carefully before using.


My Daughter did all of the painting.  Sorry for the dark work shots, it was painted in a dark basement room.


 We were going to buy some crystal knobs but felt the original brass ones worked best.Voila! Love it! Really very easy and such a better price than using the store bought chalk paint.


*Note: I purchased a gallon of the tinted flat paint for the two pieces, but really would have only needed a quart.